 Mellott's VR
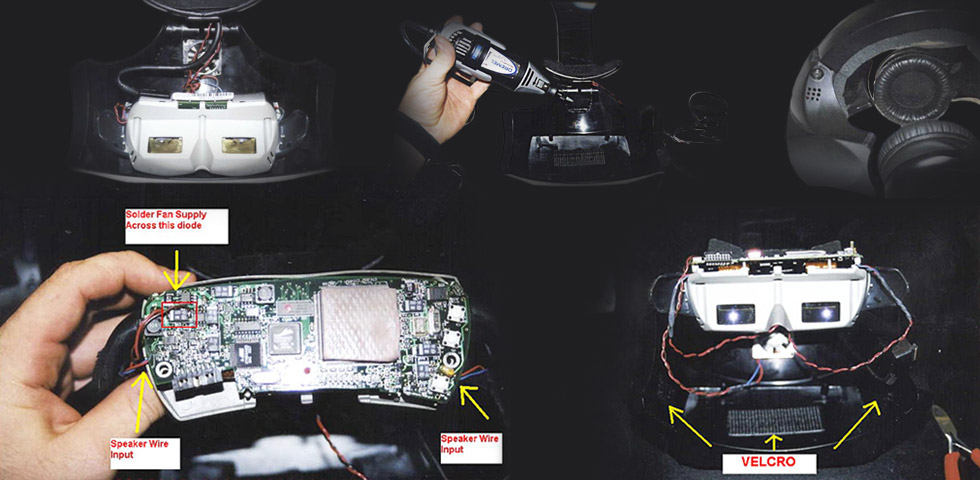
VFX2 Project
January 2004
The VFX2 project is a combination of the VFX1 shell and a pair of I-glasses SVGA 2D. This creates a very nice HMD that was inspired by Mike from Connecticut (kudawg as some know him). I for one love the VFX1 helmet design. This is what I picture in my head when someone says HMD.
By removing the arms from the I-glasses SVGA and the forehead pad you can mount the I-glasses inside of the VFX1 shell. This gives you a high resolution VFX1 or VFX2 as I like to call it.
The first step is to completely gut your VFX1. A non working VFX1 is choice but otherwise gut the one you have. You’ll want to remove everything including the optics, all circuit boards. Leave only the speaker wires in place. You will also need to remove some plastic from the inside of the VFX1 shell to make room for the fan.

There is a small ring of plastic in the top center of the inside of the shell. You need to grind this out so that a fan can be placed here.

Next, route the I-glasses SVGA cable thru the VFX1. You may have to cut some of the plastic to get the round cable of the I-glasses thru the VFX1. Route it along the same path as the optics ribbon cable. I bring my cable thru the opening in the rear of the VFX1 where the DB26 used to reside. Once routed I place two large zip ties on the cable next to the DB26 opening to prevent it from being pulled out. At this point your ready for the I-glasses to be mounted into the visor portion of the VFX1 shell.
Now you must remove the arms from your I-glasses SVGA. Do this by pushing the pins thru the arms at their pivot points. The arms will come apart. You also need to remove the forehead pad as it gets in the way. NOTE: THIS WILL VOID YOUR WARRANTY! To remove the pad you have to take your I-glasses SVGA apart. You can do this by removing the four screws in the bottom of the I-glasses. They will pull apart once the screws are removed. The forehead pad then can be un-snapped and removed.
At this point you can make custom adaptor cables for the speakers of the VFX1 and the I-glasses. Cut the wires from the VFX1 headphones and wire the correct adaptors for the I-glasses circuit board speaker connections. You will also solder the supply leads for the fan across a diode on top of the I-glasses circuit board.

BECAREFUL THAT YOU DID NOT UNSEAT THE LCD CONNECTIONS. They are glued into place but can be unsnapped when pulling the headset apart. You will know immediately that this has happened when you turn on the power to the glasses. The LCD’s will blink or behave erractically.

Once the I-glasses have been reassembled your ready to velcro them into the VFX1 shell. You need Industrial strength velcro with a stick backing. Regular velcro is NOT good enough. The Industrial strength velcro is so strong that you almost have to pry it out with a screwdriver to get it loose. If you use regular velcro the weight of the I-glasses themselves will pull the velcro loose.
When you have your Industrial strength velcro place a large strip across the front the of the I-glasses. Also place to smaller strips on the small ears that still protrude from the I-glasses (where the arms where attached). Before placing each strips partner side of velcro (the pieces that will stick to the VFX1 shell and velcro to the pieces stuck to the I-glasses) position the I-glasses into the VFX1 in a comfortable position. The best position I have found is center tilted slightly downwards. You’ll have to play around with it to find the ‘sweet’ spot for you. Once you have a general idea attach the partner pieces of velcro to the strips on the I-glasses and peel off the sticky backs. Slide the I-glasses into the VFX1 shell. Take care that the side pieces of velcro dont stick to the shell before you’ve pushed it all the way into the VFX1. Press firmly to seat the I-glasses into place.
More then likely at this point you will want to do some adjustment. Carefully seperate the velcro and adjust your I-glasses as nessecary inside of the VFX1 visor. You’ll find a good position within a few minutes.
The fan is mounted inside of a small squirel cage. This means it sucks air in from the front and blows it out the side. Most of the air is circulated thru the HMD. Some of it is blown out the small vent holes I’ve drilled on the side of the VFX1 visor.

I orginally had an intertrax2 headtracker mounted on top of the I-glasses inside of the VFX1. This gave me a complete HMD with tracking. It was a very nice setup. Now I use the same setup but with a VRTRacker 2. It works just as well and is alot cheaper.
Just a few notes. The volume control/menu control will be hard to get access to depending on how you mounted your I-glasses. I havent yet decided on a corrective action for this yet. Either holes in the visor or externally mounted switches. I’ll think on this. Also the power switch may be alittle harder to get to. Mine is easy to get to, but there is the possibility it could become slightly hidden depending on your adjustments. Again, its up to you and how you build it. Not a show stopper but might require some creative thinking. I’ll post my solution when I get around to it.
Once all this is done you’ll have yourself a VFX2. Its an awesome mod that produces the best HMD for your money on the market. Good Luck and have fun!!!
The final product.

